

How To Change The Strings On Your Ukulele

Changing your own strings can be very satisfying
It’s Easy, Once you Know how
Ever wondered how to string your uke? Although it may seem a daunting task to start with, changing your ukulele strings can be a fun and satisfying experience once you know how.
1. Loosen the first string (start with the G string, nearest your nose) and slide it off the tuning peg.
2. Carefully remove the loosened string from the bridge at the other end of the ukulele. If you have a tie-bar bridge, the string will be in a tight knot around the bridge that may need some gentle coaxing to unravel.
3. Once you have removed all the strings in this way, you are ready to start attaching your new strings.
4. There are several types of bridge on a ukulele, but the most common are a standard/slotted bridge and a tie-bar bridge.

Standard Bridge
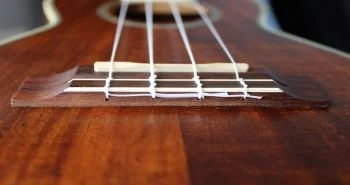
Tie-Bar Bridge
5. If you have a standard bridge, you will need to tie a simple knot at the end of each string leaving about an inch free at the end. Again, start with the G string and slip this knot into the corresponding notch at the bridge to anchor it down. If you feel like your knot might come apart when you begin to tighten it up, then you may want to make it into a double knot.
6. If you have a tie-bar bridge, slide one end of your G string into the first hole in the bridge, away from the neck of the ukulele and pull through a good 5cm to work with.
7. Take the short end of the string and loop it twice under itself where it runs over the bridge. Pull the string so that it tightens.
Looping your strings
8. Some strings might need a triple loop to stay in place (the smallest A string may be in most need of a triple loop).
9. Once you have secured all 4 strings in place, tuck away the ends of the strings underneath the other knots (see above photo of a tie-bar bridge) which will help keep everything in place.
10. That’s the tricky bit over with!
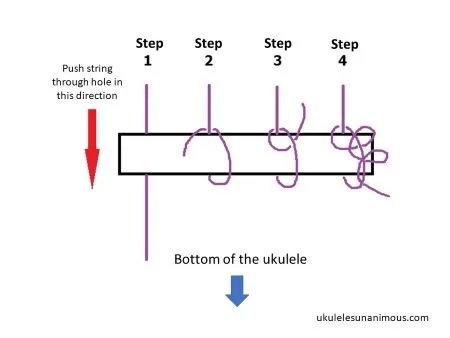
Now at the head of your uke, thread the other end of each string through the corresponding hole in the metal tuning peg, pull the string taught and tighten up the string by twisting the peg – trap the end of the string under the first wind to keep it in place.
11. Wind the pegs facing up in an anticlockwise direction and wind the pegs that face the floor in a clockwise direction.
12. When all four strings are securely in place, cut off the ends of each string around the tuning pegs to tidy it all up.
Congratulations!
You have now mastered the art of string changing and are ready to tune your ukulele.
• After you change the strings, they will take a few days to stretch and settle properly into tune, so be patient and be prepared to tune up more frequently after a string change.
• Use an online tuner to help you to tune up your new uke strings.
• Don’t forget, changing your strings also provides an opportunity for cleaning and oiling your fretboard if it looks dry.
It is so much better to learn how to do things by watching someone else do it, so here’s a helpful ukulele string changing video from Cordoba.
Happy Strumming 😊
How to change the strings on your ukulele